The 'Original' Creative Crafting Magazine written by Crafters, for Crafters

Creative Crafting magazine began in August/September 2009, when a group of crafting friends on the Creative Connections network decided that it would be a good idea to raise awareness of the crafting community. From this point they started work and the first issue of Creative Crafting was published in October 2009 and the last was June 2014.
Now we are bringing you everything crafty from the home and beyond.

Thursday, 29 March 2012

A Year in Sante Fe Part 1


A Year in Sante Fe Part 1
Written by Jim from Kath Guitars
Published in the October 2011 Edition

Literally across the street from our house!
My wife, Maritza, and I have had for the past thirteen years the goal of moving to Santa Fe, New Mexico.  For those unfamiliar with this strange and quirky place, go hit Google and check it out.  It’s a place like no other location in the United States and runs the gamut from filthy rich to dirt poor, from English as the primary language to Spanish as the primary language, from highly scientific (Los Alamos Nuclear Labs is close by) to being the biggest artist community in the country; a place where an artist who makes clay pots for a living is sitting in a swanky restaurant next to a nuclear physicist, both eating the same wonderful, Native American dish.  Not to mention, since this is really their home, not ours, the multitude of Indian Nations found in the region.

Most of New Mexico, long ago, used to belong to Mexico.  But like most great places in this country we took it for ourselves (actually, my family wasn’t a part of that theft, we came here from Denmark in 1901 and Maritza’s family came here from Colombia in 1956).  The part that didn’t belong to Mexico belonged to the Native American Indians, but we took that too.  We really, really, wanted it.  And like many other places in this country, we put the word “New” in front of Mexico letting the world know that we’ve improved it and everyone should now know it is ours (New York, New Jersey, New Orleans, New Hampshire, New Providence… you get the idea).

We’re located in the middle of the desert.  It’s not the thousand miles of sand kind of desert, but the kind you see in all the old westerns: tumble weed, coyotes, rattle snakes, big spiders, Jerusalem Crickets and people in cowboy boots, only now they ride in large SUVs instead of on horses.  But there are plenty of horses too.  All of the houses are adobe style, which we absolutely adore, and our lawns are not grass, but rocks, which thankfully don’t need to be trimmed once a week.  The moths here are the size of airplanes.  We have a five-pound Yorkshire terrier named Sable and we must constantly stand guard as many locals have lost dogs and cats to the coyotes, owls and other large predators.

So, the reason for this article is to chronicle our first year in this foreign land (yes, I stole the idea from Peter Mayle’s “A Year In Province”, but we Americans are good at taking other peoples’ stuff and making it our own, see the above paragraph regarding the word “New”).  It so many times happens that what we experience is vastly different from what we expected.  We’ve only been here a month and already it has started.  I won’t go into all of the history of Santa Fe as there are literally hundreds of books on the subject and I don’t have enough space here to do it, so I’ll stick to our experiences and hopefully you can fill in what’s missing with outside material.

Our goal was to begin living the work lives we have always wanted; making and selling our artist works.  Maritza is a jeweler specializing in southwest jewelry and I’m a guitar-maker specialized in covering the house with dust and wood chips.  Because everyone reading this has this same dream (to live off of their art), I thought it would be interesting to chronicle just what it takes to make it happen (if it in fact ends up happening).
This year I’m turning fifty and Maritza is… (I’m not allowed to divulge this closely held secret).  I thought it was time in my life to give up the corporate world for the art world.  But as the wing-walkers used to say “Never let go of what you have until you’ve got hold of something else”.  So, I’m continuing to work in the computer world except that I’m telecommuting from my house.  I still work all day at my computer job, but at least I don’t waste time bathing and driving to work (sometimes I still bathe though, when Maritza complains).

So, to start at the beginning of our trip,  we packed up our rental house in Denver, Colorado. Unfortunately the truck I rented did not accommodate all of our personal belongings plus all the woodworking tools from my shop.  We had to rent a second truck that Maritza would drive and I would tow one of our cars behind my truck for the 7-hour trip.  Our other car we left with a previous neighbor then paid someone to drive here for us.  So, with the extra truck, extra gas and paying the guy to drive my other car, that cost us easily another thousand dollars.  Oh well, bad planning.

Front of our house
Our house was waiting for us when we got here and I was anxious to setup my shop in the two-car garage, which I did, until I started getting nasty looks from the neighbor across the street, so I closed the door to setup in private.  Glitch number two: the realtor forgot to mention that it is forbidden to do anything in the garage except park the car.  No pastimes, hobbies, businesses or monkey-business of any kind.  Hmmmm, that was NOT what I wanted.  So, I’m continuing to work in the garage clandestine style.  I sound-proofed it as best I could and figured I’d just do my thing until somebody complained.  So far, so good.

Making stuff is what we’re all good at.  Selling stuff is a completely different matter though.  Publish or perish.  We searched for a good place to sell our work on the weekends.  First we paid to be in a place that’s called “The Artist Tent” that operates on the weekends at a horse race track nearby.  We paid the three hundred dollars for the month.  Then we learned that everybody’s stuff keeps getting broken from the wind as well as being constantly covered in dust.  When it rains, the Artist Tent (imagine a big circus tent) becomes a raging river.  Worse than all of that, nobody was selling anything.  It seemed the tourists didn’t want to go out to the racetrack even though there was a free shuttle service.  We decided to write off the money we’d spent and find another place.

The Rail Yard
We found a location called the RailYard because it’s, well, a rail yard.  On Saturdays it’s a huge farmer’s market and on Sundays it’s an artists’ market.  We got a table for each of us and it was only $35, much better than the Artist Tent/River/Dustbowl/Wind tunnel and it’s indoors!!!  Yeah.  With air conditioning and heating and a bathroom.  Yeah.  Oh, speaking of air conditioning, the house we rented proudly boasted that it was equipped with air conditioning.  It’s not.  And we arrived in August, the hottest month of the year in New Mexico.  It has a swamp cooler which is more like a swamp and less like a cooler.  A very noisy swamp at that.  It’s basically a huge unit that dribbles water onto a filter and then has a fan behind it.  It doesn’t work.  It sounds like a tractor idling in the living-room.  But I digress.


Our first week of selling, Maritza did really well, like about seven hundred dollars.  The second and third weeks, not so much and the fourth week was about two hundred dollars.  But, little did we know, September starts the big tourist season for the year, so we’re optimistic things will improve.  Since my guitars sell for around five to six thousand dollars, I’m not expecting a lot of sales at the RailYard; for me it’s mostly exposure (the legal kind) and to let the local musicians know that I’m in town and what I do.  I’ve already gotten a couple hundred dollars worth of repair jobs.  There are a LOT of guitar players in Santa Fe.  So… fingers are crossed.


Maritza setting up at the RailYard

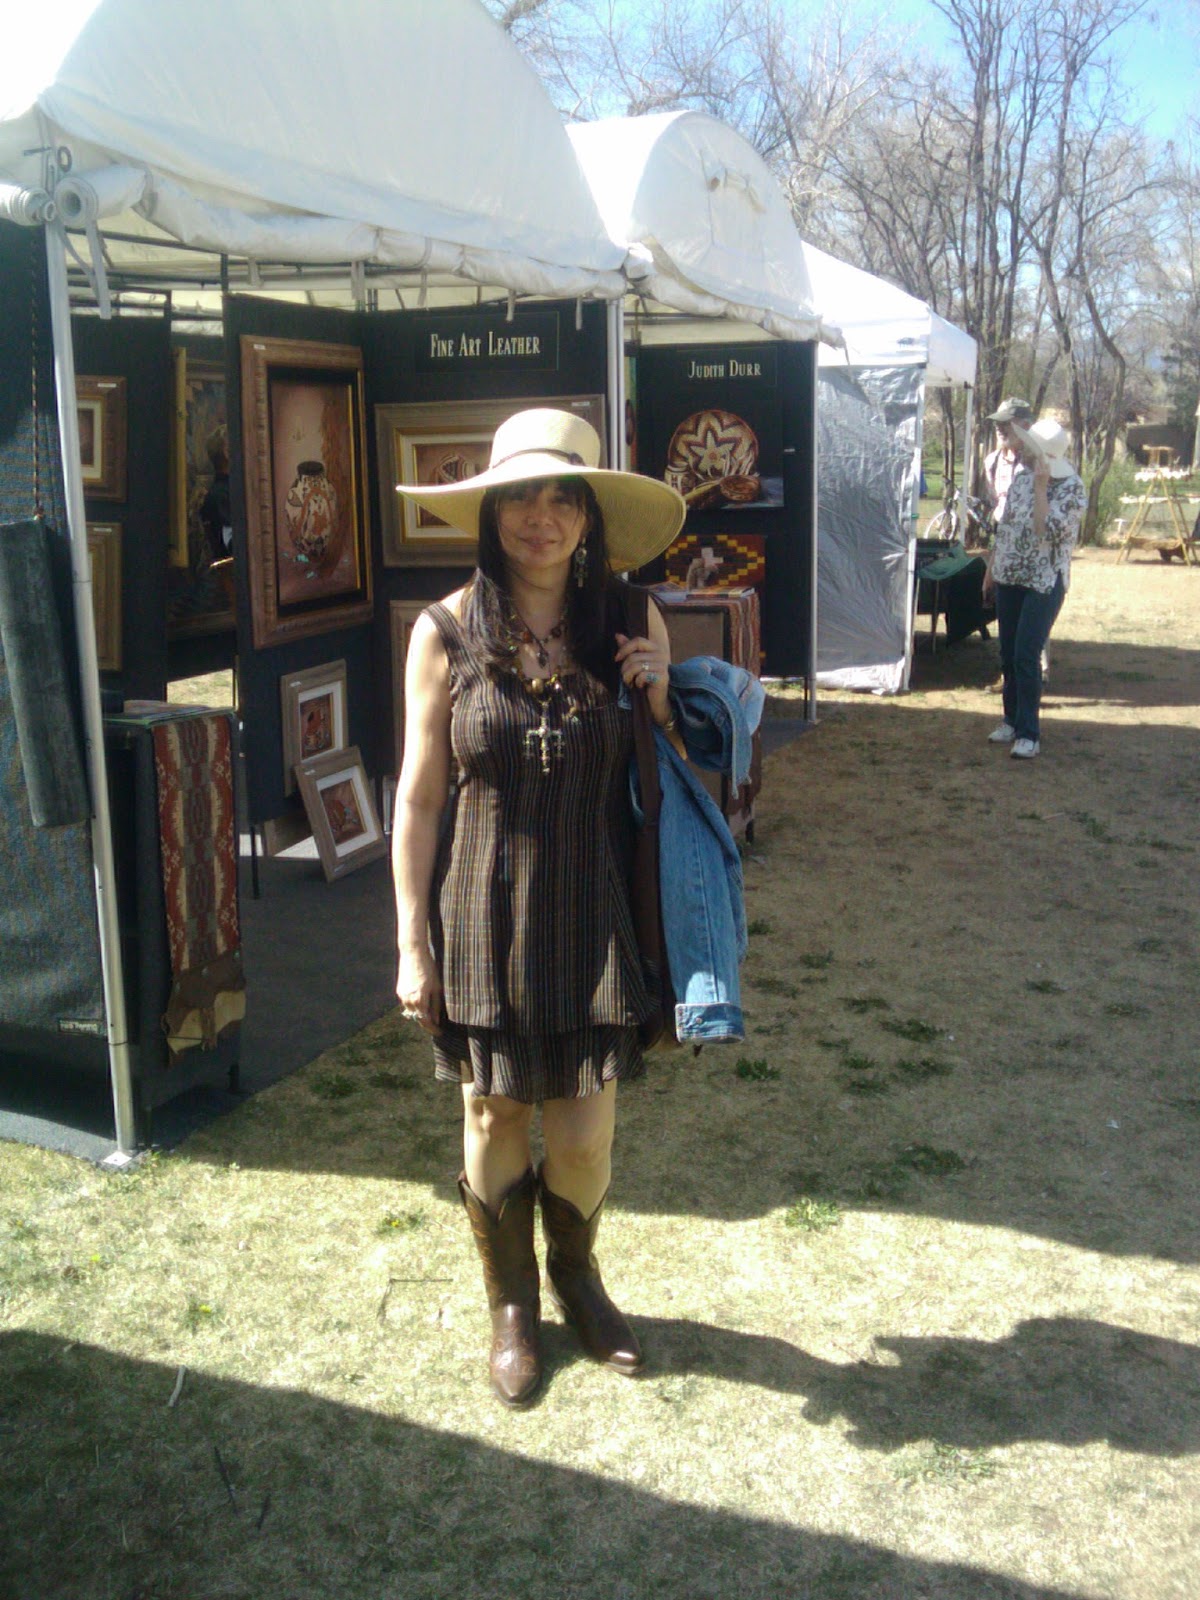
Jim at a show (we shared a tent.  that didn't work out 
so well :-) )

In addition to the RailYard, Maritza has also had several galleries express interest in her work.  That’s the best of all scenarios because then her work will sell and she doesn’t have to be there.  Of course the galleries take a giant commission, so we’re debating that approach at the moment.

So, that’s it for our first month.  A lot of activity and a little bit of sales; all in all not a bad start.

Jim with his assistant in the new guitar shop


Friday, 24 February 2012

Spring Clean Your Crafting Business

Spring Clean Your Crafting Business
Published in our June 2011 Issue
Written by The Crystal Lady


If you are finding your craft business a little slow right now, try not to let it get you down too much. Everyone is in the same boat in the current financial situation. A lot of small crafters are giving up and calling it a day, this is a huge shame as so much work goes into creating products and marketing them. (The latter can often take more time than actually making the product in the first place). It can be extremely depressing when days/weeks/months go by without a sale but there are things that you can do to lift your spirits a bit. Look at it as a fantastic opportunity to Spring Clean your business.
Look at your current stock of products. Are any of them looking a bit tired, if possible could they perhaps be revamped into something new?
Scour the Internet and other sources looking for fresh inspiration. Create a new product line or update an old one.
Does your Website/Folksy/Etsy shop etc need a facelift? Sometimes changing a colour scheme or moving things around can work wonders when getting people to find your store.
Could your images be better, or more uniform. With a bit of time on your hands you could perfect those all important sales pictures.
Blog, twitter, Facebook. This all takes time so make use of it while you have it.
Contact previous customers and ask for Feedback. This can not only be very useful but also reminds them that you are still there and may cause them to revisit your sites.
Join groups or get together with other crafting friends, share the marketing, more blogs, Facebook pages, twitter accounts reach more people.
It is very easy to feel that the world has forgotten you and it is easier to just give up. Try and remember why you were attracted to crafting in the first place, how much you enjoy creating. The vast Crafting Community will continue to support each other ready for when things take a turn for the better. One thing that I have always found is that there is always someone willing to offer a kind word and inspiration when you need it. You only have to ask.

"The greatest mistake you can make in life is to continually be afraid you will make one."Elbert Hubbard


Thursday, 23 February 2012

How to make a Wine Cork Notice Board

How to make an AmyOrangeJuice
Wine Cork Notice Board
Published in our June 2010 Issue
Written by Amy from AmyOrangeJuice

I have been making these for a few years now and they go down very well as
presents for the blokes in my life! So if you want to give your Dad something to
stick pins in this Father’s day, this may be just the thing!

This is a very simple project to do and looks really effective. The whole thing only took me an hour or so (with sometime for a cup of tea while the paint dried).


You will need: Lots of old cork wine corks (the plastic ones are no good).
I got a huge amount from the local Scrap Store in Exeter, but you could ask your friends or the local pub/restaurant to save some for you. My friends are always turning up with small bags of corks for me and every time I have a big enough stash I make a new board!
Strong Glue, undiluted PVA will be fine
Sand paper
A small hacksaw
An old picture frame, the size you require
Paint or spray paint
Step 1
Remove the glass from your old picture frame, and recycle the glass.  You need the stiff backing to stick the corks onto and the frame itself will give a good edge for the corks and is the secret to keeping it straight and giving a professional finish.
Step 2
Quickly sand down the frame so that the paint has a rough surface to get more adhesion to; this a couple of minutes will do the trick, just to rough up the surface of the frame.
Step 3
Paint the picture frame and leave to dry. It doesn’t matter if you get paint on the backing as the corks will cover this. I used the left overs of a tester pot of emulsion paint mixed with a little PVA glue to give it a better purchase on the wooden frame.
 
Step 4
Stick your corks down in neat rows, or make a pattern with them, as you wish. Push the first row right up to the edge of the frame and keep the rows tight without gaps.  If you have some bigger corks cut them down with the hacksaw so that the corks are a uniform size. If at the end of the row there is a gap which is less than the size of the corks, again cut them down to fit the gap. And just keep building up the rows. Cork cuts quite easily with a hacksaw, just remember to hold it firmly (or if you have a vice use that) and keep your fingers out of the way. My Dad’s top tip for sawing things: is to let the saw do the work, just make a gentle constant action and don’t push down on the blade. He is right, works a treat!

Step 5

Let the glue dry and then get the drawing pins out!

To personalise the board as a great gift pin some special treats to the board, some tickets to a special event, some lovely photos, some packets of seeds or some specialty tea bags that come in their own little paper envelopes. Or do what I have done and hang it in your house! Mine is in the Kitchen.


How To Zen Doodle

How to Zen Doodle
Published in the June 2011 Issue
Written by Zoe Ford from Top Floor Treasures

Do you doodle while you’re on the phone? While you’re writing lists? When people ask me what I sell they look at me like I’m crazy. "How can you be selling doodles?" they ask. What they don’t realise straight away is that the doodles I sell are not like the doodles you might draw while on the phone. They are weird and wonderful works of art!

I used to doodle hearts and stars and boxes, but when I came across the concept of Zentangle™ http://www.zentangle.com/about-what-is--1.php my doodles morphed into something completely different.

I don’t draw all of my doodles in the prescribed Zentangle™ way. Some of them are inspired by Zentangle™ though, so we call them Zendoodles or Zentangle-Inspired-Art. People usually only see one of my completed Zendoodles, and they often comment that it looks very complex and must have taken a really long time. I’m here to show you that it doesn’t have to take a long time, and it’s not as complex as it might first appear.

Start with a blank piece of paper. I like to use watercolour paper or card, but the back of an envelope will do! I use professional-quality black fineliners in different nib-sizes but a felt tip is fine to start with if that’s all you have to hand. I sit and look at the paper for a while and think about how I’m going to start. How about a simple pattern to start off with:


Whilst repeating the pattern you may find yourself relaxing, almost in a Zen-like state. It clears the mind, just letting the pen go where it wants to go. Doodling in this way is a great stress-reliever!


Add in some finer details and expand upon the first pattern. Not sure what pattern to draw next? Try searching for doodle patterns or tangles on Flickr for some inspiration – there’s a whole world of doodlers out there!


Keep on adding patterns until you run out of space.


It really helps to give depth and form to your doodles if you shade them with a good pencil when you have finished doodling. Get the shading right and it can look really 3D.


And that’s it! Sometimes it’s good to have a shape to fill with doodles. You could draw around a series of round objects and fill in the spaces or perhaps draw the outline of a letter and fill that.
This one is standard trading card size (3.5 x 2.5 inches) but you can go as big or as small as you like! My smallest is a 1 x 1 inch square while my biggest Zendoodles so far are A3 (approx. 17 x 12 inches – huge!) I hope lots of people will have a go at Zendoodling; I’d love to see what you create.


Wednesday, 1 February 2012

Thursday, 26 January 2012

Catch The Love Bug

Featured in the February 2011 edition.
Written by Mirribeads


Feeling all giddy? Is your stomach filled with the fluttering of butterflies? Oh yes, you’ve caught the love bug all right. With valentines just around the corner, it’s high time you pass
it on to this special someone that’s making you float on cloud nine. To help you I’ve created a gorgeous love bug, for you to make.


This is what you need:
0.315 mm thick coloured copper wire in dusky pink or red:
 -3 pieces of 7 cm for the legs
Ÿ -40 cm for the body
1 flat oval red glass bead, 2 cm long, 1 cm wide
2 crystal AB glass hearts, 1 cm
1 red AB glass heart, 8 mm
12 red bugle beads, 7 mm
6 facetted red AB 4 mm fire polished beads
11 size 8 metallic peach seed beads
16 size 11 silver lined clear seed beads
Cutter for the copper wire


Step 1. The body
Take the 40 cm piece of wire and fold it in half. Thread on one size 8 seed bead through one end and let it sit in the fold. Through both ends pushed together thread the oval bead.


Push it up to the seed bead.


Step 2. The wings
Take one end of the wire and thread through one of the 2 larger hearts, pointy end first. Now take another size 8 seed bead and thread it on. Now thread the wire back through the heart, making sure it is pushed tight to the oval bead.


This is your first wing, now repeat with the other wire end. 


Step 3. The head
Put both wire ends back together again. You can twist them round each other for about 5 mm to secure the wings. Now thread on the red smaller heart, pointy side first. Push it tight towards the wings, so they are firmly in place. Split the wire ends again and, on one of them, thread 8 size 11 seedbeads. Finish off with a size 8 bead. Push the beads right up to the heart. Loop the wire round the size8 bead, then push it through again. Snip the wire as close to the bead as you can. Now repeat with  the other wire end.


Step 4. The legs 
Take one of the 7 cm lengths of wire. Thread on one of the facetted beads. Push it towards the end of the wire and then loop the wire through the bead again. Snip off any excess wire at the back end of the bead. Thread on 1 bugle bead, 1 size 8 seed bead and another bugle. Now wrap the wire round 
the base of the head of the love bug, pulling the beads as tight as you can to the bug. Thread on the third bugle, another size 8 bead and then the last bugle bead. Put on a faceted bead and push all the beads as close as you can to the body. Thread the wire in a loop through the facetted bead again and snip of as close as you can to the bead. The love bug now has its front legs. 

To create the other four legs, repeat this process, making sure you wrap the legs closer to the oval body rather than the head.

Step 5. Finish off
Shape the legs and wings in the position you want them to be. To attach this bug to a brooch, you can take another piece of wire and wrap the bug with it to a brooch base. Alternatively you can hang it on a piece of chain by using another piece of wire to loop round the head and shape a loop with it, to thread some chain through.  


I hope you will enjoy your love bug and pass it on to someone special.
Once you’ve made the bug, you can attach it to a brooch, make it into a pendant or even make two for a cute pair of earrings.


Tuesday, 3 January 2012

Why we love what we do!

Why we love what we do!
Featured in the February 2011 edition.
Written by Tracey Kifford from WowThankYou

"Love begins at home, and it is not how much we do ... but how much love we put in that action."
Mother Teresa

What drives the artist, the crafter, artisan or small producer? Hopefully it’s not always a case of "I must get these orders filled for Valentine’s Day or Easter or else I’m for the high jump!" Surely there must be an element of loving what you do and a sense of satisfaction at producing items that are unique, personal and brilliant? What makes you get out your sewing machine/sketch pad each day - why do you do it?

For some there is an element of breaking free from the mundane day job and entering the freedom of doing what you want to do. For others who have already made the jump and given up the day job there must be a sense of liberation and excitement, of course tempered by the need to pay the bills. How do you feel about what you do? Is it therapeutic ‘chicken soup for the soul’? Does it provide some useful pennies? Does it give you more quality time with your family?

The crafters on WowThankYou have told us their reasons for doing what they do and these range from being able to spend more time with the kids to feeling more at one with the universe.

Ley Holloway from the Vintage Beadery says she works intuitively "If it feels good do it ... I make it up as I go along". Ley adds "Sometimes the best bit about creating is being able to surprise yourself with the result ... and it is not what you set out to accomplish but is just great all the same". Ley recently produced a fabulous piece from the accidental mixture of two sets of beads that occurred simply because she had not cleared away a previous project, "untidy is sometimes good and some of the best work comes from this type of spontaneity ... producing something totally off the wall is sometimes the best way to start a new trend or brand."

Martina Macklin of Sparrow Primitives has a more primeval need to create something new; she says "Creating is something I am driven to do and I have been doing it from when I was old enough to hold a pair of knitting needles ... The best bit for me is seeing something take shape from a piece of fabric and take on a character of its own." She gets a real sense of satisfaction from creating her products and ends by saying "Nothing beats the feeling you get when someone likes your creation enough to buy it."


Pandy Grenville-Evans of Princess Kitten has a more earthy view of crafting and grafting telling us that "the very best bit about crafting is getting all mucky and realising that you have forgotten to cook dinner! You get so involved in what you are doing the whole world disappears." I suppose one could call this the shear organic joy of creating something unique and escaping into your own world just for a little while.


Lisa Galvan-Reyes of Craft on Canvas is an artist and a talented interior designer and uses her skills to do the things she loves. "I have a passion for home interiors and I love to create an individual look." She loves the colours and the challenge of producing a unique design to give an individual look. She sums up her love of crafting, "I love the excitement, the apprehension, the challenge. I also love the variation of painting, cutting and sewing that is involved with my artwork. I love to involve my children, asking them to draw new designs and colour them in. The kids actually give me some great ideas and they know that their opinions are valued in everything I produce."


Charlotte Hupfield from Charllotte Hupfield Ceramics is a talented ceramicist producing wonderful contemporary pieces, which she markets through her own studio and shop. She loves the idea of having her workshop/studio at home and only a few paces away so that when inspiration strikes she can act immediately and produce that ‘killer’ piece. She says "nothing can beat the wonderful feeling when someone buys a piece that I have produced, and knowing that the item will be loved and appreciated as much as I have done."


There are of course added perks to working from home, as Helen Lloyd-Hoare from Moonstone Glass enthuses, "I love crafting, because it means I can be surrounded all day by the people I love. We enjoy working together, and spending fun-filled days at fairs and festivals. My daughters love being part of the family business."


Gaye Milton-Weekes from A&V Designs is of the opinion that most crafters do not do it for the money. She has such enthusiasm that she says "when a new batch of fabrics arrives, I always feel like a child in a sweetie shop!" She loves all her items, and feels this is important, "I know I love what I do and every item I make becomes my new favourite – until I finish the next one! ... Even when I’m not working I find myself drifting into the work room to look at the fabrics which excite me." She concludes, "How do I know I love what I do?" "Well, I’ve not made anything I wouldn’t have loved to keep for myself."

So there you have it - crafters do what they do for a variety of reasons: Immense satisfaction being a great start, an enjoyable hobby that brings in a modest income that can be carried out around being a parent, a ‘release’ from the everyday stresses of modern life ... they do it because they love it and can give over part of themselves in what they do, producing articles from the heart of their creative imagination for the rest of us to admire, appreciate, purchase and cherish.

Happy Valentine’s Day from WowThankYou. I started on a quote, so I’ll end on another one:
"Love is a canvas furnished by Nature and embroidered by imagination."
Voltaire