The 'Original' Creative Crafting Magazine written by Crafters, for Crafters

Creative Crafting magazine began in August/September 2009, when a group of crafting friends on the Creative Connections network decided that it would be a good idea to raise awareness of the crafting community. From this point they started work and the first issue of Creative Crafting was published in October 2009 and the last was June 2014.
Now we are bringing you everything crafty from the home and beyond.

Friday, 28 September 2012

Millie-Mae and Mummy makes.... Ghoulish Hangmen Bird Feeders

Published in Issue 19, October 2012
Written By Millie-Mae and Tracey Kifford


Are you, are you
Coming to the tree
Where they strung up a man they say murdered three.
Strange things did happen here
No stranger would it be
If we met up at midnight in the hanging tree.

Are you, are you
Coming to the tree
Where the dead man called out for his love to flee.
Strange things did happen here
No stranger would it be
If we met up at midnight in the hanging tree.

Are you, are you
Coming to the tree
Where I told you to run so we’d both be free.
Strange things did happen here
No stranger would it be
If we met up at midnight in the hanging tree.

Are you, are you
Coming to the tree
Wear a necklace of rope, side by side with me.
Strange things did happen here
No stranger would it be
If we met up at midnight in the hanging tree.

From The Hunger Games

When you go down to the woods today, you’re in for a BIG surprise! We’ve gone all Spooky this month – yet practical too – and have made some hangman bird feeders, ready for the wintering birds packed full of nuts, seed and fat. Warning – this is a very messy project!

You will need:


Large Saucepan
Some old baking trays
Greaseproof paper
Wooden spoon
Large gingerbread man cutter
Red food colouring
Wire sandwich bag ties (for ‘skeleton’)
‘Rope’ (we used paracord)
Scissors
Lard (we used 500g beef dripping)
Bird seed (big bowl full)

Method:


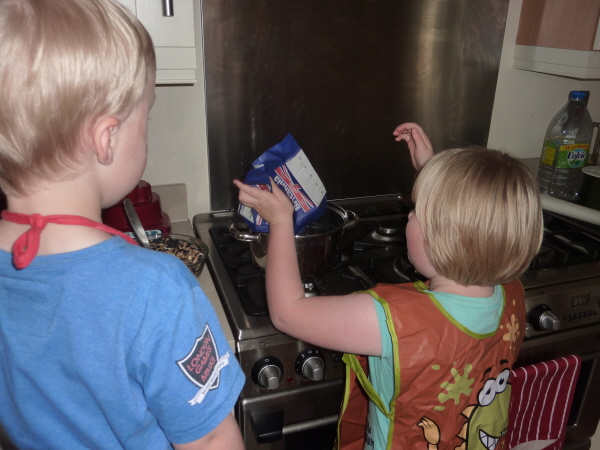
1. With adult supervision, place the block of lard into a large saucepan, and over a low heat allow it to melt entirely


2. Once melted, take off the heat and carefully pour the bird seed into the liquid. Mix well.


3. Keep adding the seed until it gets quite thick. Then leave to cool for a good 30-45 minutes.


4. When the fat starts to set (turn white), place the gingerbread cutter on a piece of greaseproof paper and fill with the bird mixture. Pack it down well.


5. Take the wire bag ties and make a ‘spine’ for the hangman (this will add strength); we also added a loop to attach to the noose later!


6. Carefully remove the cutter and then place in a fridge while you make the noose!


7. To tie a noose, or more accurately ‘the hangman’s knot’ – we have to say we cheated and found a guide on Google. It’s frighteningly simple to do. Millie-Mae had a go at making one, but it wasn’t something we want her remember, so we made most of them ourselves, following this simple image:


8. Once made, put the rope over the head of the bird man, take a small brush and add some ‘blood’ in the form of red food colouring.


9. You’ve finished! Hang outside on the trees – very effective in a row of several during twilight!


Millie-Mae (aged 6) and Toby (aged 3) are the children of Tracey Kifford, owner of the marketplace WowThankYou


Trick or Treat Lollipop Pendant

Published in issue 19, October 2012
Written by Claire from Elderberry Arts

Trick or Treat Lollipop Pendant


What You Will NeedCraft knife
Small amounts of black and green fimo
Cocktail stick
2 x  1/2 inch eye pins


Step 1. Cut off a small piece of each colour clay - around 1 cm will be fine.
Condition clay to soften and roll into balls.


Step 2.  Roll each ball into a thin sausage approximately 15 cm long.


Step 3.  Wrap the sausages around each other and cut the resulting sausage in half.


Step 4. If you like, you can roll the sausages a little to blend the twists.


Step 5. Take one sausage and coil it. Press down the end to secure. Now repeat with the second sausage.


Step 6. Cut the cocktail stick in half and push into the bottom of each lolly.
Insert an eye pin into the top of each lolly to finish.


Step 7. Remove the cocktail sticks carefully and bake according to the manufacturers instructions. You may need to use a little glue to secure the sticks back in after the lollies have cooled.


Voodoo Doll Tutorial

Published in Issue 19, October 2012
Written by Maria River from MsBittyKnacks
http://www.etsy.com/shop/msbittyknacks

Who do you Voodoo?


Here is a simple and fun tutorial on how to make your own Voodoo Doll!
Instructions and materials listed are to make an 8 inch doll like the one on the picture; of course colors and materials can be changed to your own liking. Now lets have some fun!

Some Materials:
Fabric (Burlap and black Cotton)
Felt Sheet (black & red)
Yarn or Embroidery thread (black and red)
Polyfill Stuffing
Scissors
Pins
Tracing Paper


Using the tracing paper, sketch a person. Mine was about 9 inches. Remember to leave as minimum a 1/4 in for later sewing.
Don't worry if it isn't perfect, follow the tip to below for cutting ;)


We are using 2 different fabrics: burlap for the outside and the black cotton for the inside lining.  
Using the paper pattern just made, secure it to the fabric with some pins and cut. 
But, read the tip below first! 


Using the black thread, I do recommend a crafts or heavy duty one; secure the 2 fabrics together along the edge. I used the most basic stitch, a running stitch. 


Put aside the little dolls. Using the felt sheets cut out 2 circles (for eyes) and 1 heart.


Secure the felt eyes and heart to the dolls with pins and using matching color yarn or embroidery thread sew in place. Note: you can use a running stitch or a back stitch, your choice* With the black yarn free hand the mouth of the dolls. I used basic XXXX and the classic stitched mouth look.


Now we put it together. Secure the doll with a few pins, right side up. Guiding yourself with the previous stitch done (from step 3) fold the fabric edges towards the inside and sew the 2 flaps together. You will notice the burlap may begin to loosen some fibers, try to tuck them in as best you can, don't worry if some stick out, remember this is a Voodoo doll it's supposed to look raggedy.
PS. don't forget to leave a hole for stuffing, I do recommend the top/ head part.


Copyright 2012 MsBittyKnacks Whimsical Decor & Designs


Make your own Halloween Bunting

Published in Issue 19, October 2012
Written by Kerry from Crafts from the Heath


Halloween Mini Bunting


Materials Required:
Orange cotton fabric
Black/white polka dot fabric  
Black cotton fabric
Black bias binding tape 19 or 25 mm 140 cms long
Felt –orange, green, black, brown, white
Sewing thread
Pins
Sewing machine 
Triangle template shape 12 cm across x 12 cm dow [middle to point]
Scissors
Pencil
Iron

Step 1 Cut 4 triangles using the template from each of the fabrics – you should have 12 triangles to make 6 double sided bunting flags.

Step 2 Cut out your Halloween felt embellishments to go onto your bunting flags. I decided on a ghost, witch & pumpkin but you could also choose a spider, spider’s web, skeleton, or anything Halloween themed.

Step 3 Pin your embellishments onto the right side of the flags [front side] & sew around the shape securing it to the flag – this is also the time to sew any additional features to faces or shapes.


Step 4 Once all the embellishments are secure, pin your flags with right sides together.  Taking a seam of about 5 mm, sew down one side to the point and stop. Then keeping your needle down in the fabric, turn and sew up the other long side. Do not sew top edge.


You can sew all the flags in one go.  As you get to the end of each flag allow your machine to sew a few stitches without fabric, then introduce the next flag.  This saves time and thread!
Then just cut the thread between flags when you have finished sewing them all. Remove pins.


Step 5 Cut away excess fabric at the point of each flag, making sure not to cut through the stitches. Now you can turn the flags the right way. You can use a pencil to gently push the point out fully. Press the flags with an iron to make them neat.      


Step 6 Cut 140 cm of bias binding.  Fold it in half lengthwise (you may want to press it with an iron).  Pin your first flag 20 cm from the start of the binding & space the flags out leaving approximately 6 cm between each flag.


Step 7 Sew from the end of the bias binding to just before the first flag, through both sides of the binding – this will form a channel to hold the flags as you sew along.


Next slot the top edge of first flag into fold of binding. Sew through binding and flag and stop, needle down, when you have sewn all along the top edge of one flag. Repeat with all the flags until all are secure. Make sure the flags face the right way with all the embellishments facing the front. [Try to sew as close to the edge of the binding as possible making sure that the top fabric of the flag is secure.] Now sew to the end of the binding – you should have approximately 20 cm either side to tie the bunting . 

Now hang your bunting & admire with pride !

Larger bunting with different design. 
You can make larger bunting using a larger template & longer bias binding. 

I usually use a template of 15 cm across by 20 cm drop & 3M of binding with 8-9 flags.


Halloween and it’s origins


Published in issue 19, October 2012
Written by Martina from Sparrow Primitives


Halloween and it’s origins

I love Halloween. I grew up celebrating it and have continued the practice with my children. However I have been surprised by the number of people I’ve met who have not realised that Halloween has its origins here with the Celts and is not an American invention. Many cultures have days for the dead e.g. The Buddhists have The Festival of Souls – Obon - celebrated in July in Japan and August in China, Mexico has El Dia de los Muertos -celebrated between 27 October and 2nd November and China has Qingming festival to name but a few. I won’t bore you with reams of history but thought you may like a brief overview of Halloween’s history and customs.

It is generally believed that Halloween has it’s origins with the Celtic peoples. They celebrated four main festivals : Samhain, Imbolc, Beltainne, Lughnasadh. The Celtic year began with Samhain (now commonly referred to as Halloween). Stories have it that all the hearth fires in Ireland were put out and then re-lit from a central fire kept by the Druids near Tara. To the Celts, time was not linear but moved in circles. Samhain was celebrated around 31 October and it was believed that the veil between this world and the land of the departed was thought to be so thin that the dead could return to warm themselves at the fires of the living, and some of the living would be able to enter the otherworld through the doorways of the sidhe, especially at the Hill of Tara in Ireland. Some historians believe that food was left on the table to welcome the the visitors from beyond (the Treat part of Trick or Treat ). 

The Celts did not believe in demons (or the devil) but they did believe in the sidhe. The Sidhe were known as the people of the mounds as they were believed to inhabit them and also the land of Tir Na n’Og. (The sidhe are now often called fairies.) Many trees and mounds were believed to be under their protection and if a human destroyed or damaged these, then he and his family were believed to be cursed. Because the veil between the two worlds was believed to be so thin at Samhain, it was understood that some fairy folk would roam the countryside creating mischief (the trick part of trick or treat). At this time of year, the Celts brought their cattle in for the winter, and in Ireland the warriors, the Fianna, gave up fighting until Beltainne and there is historical evidence that playing boardgames was popular! 
So how did the Celtic Samhain become our present day Halloween? In the 4th and 5th Centuries, Christianity arrived in Ireland. The early Church officials soon found that the Celtic people were extremely reluctant to give up their deeply engrained traditions, so the Church adopted a practice which had worked elsewhere – impose a church holiday on to an existing tradition e.g. the Germanic Yule became our present day Christmas, the Celtic Imbolc became Easter and Samhain became All Hallow’s Eve or Halloween. 
Some believe that the early Church used fear to make the Celts adhere to the new religion and so the Faeries became demons, the much loved dead became ghosts and ghouls and the Church introduced the concept of the Devil (and evil) to the Otherworld. Many believe that the early church used the Celts’ superstitions to their advantage and transformed what was a Harvest thanksgiving, an honouring of departed loved ones and an offering for protection through the long harsh winters into a frightening picture of hell fires, demons, rotting corpses and the like.


All Saint’s Day and All Hallow’s Eve were reintroduced by Pope Gregory III in the 7th Century and to put it all in a nutshell, rather than bore you with loads of dates, it is commonly believed that All Saint’s Day (Hallowmas – a mass to honour the Dead) was moved to 1st November because the Celts stubbornly stuck with their Samhain celebrations, particularly that of the large bonfire. The 31st of October became All Hallows Even (evolving into Halloween) and the church taught that the bonfires would keep the Devil away. The Church later introduced All Souls Day on 2nd November – a day to pray for souls stuck in Purgatory. At the time of the reformation, Luther and Calvin, among others, tried to call a halt to these Catholic observances but the Protestant communities continued to hold autumnal festivals where many of the old practices continued. 


Funny to think that we can thank the Church for continuing with the ancient practice of remembering the dead and associating it with a festival, bonfires  and the like!
But all of this is a long way from our modern Halloween celebration, with it’s customs, games, witches, vampires, bats and things that go bump in the night!

Try to imagine Halloween without Witches…How have they become synonymous with our present day Halloween? Once again it is widely believed we have the Church to thank. There are many theories as to the origins of the word “witch” and how it became associated with evil, but a commonly held theory is that it is from the Anglo-Saxon word “wicce”, meaning Wise One. The Church, as we have seen, incorporated many traditional festivals and customs in order to keep the locals happy. However the patriarchial church had no place for the Wise Woman of old and so she was persecuted. Think of the infamous Witch Trials, burning at the stake and reign of terror which occurred. The last official documented Witch burning in the UK took place in Scotland in 1722. It was only in 1952 that the Witchcraft laws were finally repealed. Somehow the association between Samhain (now considered evil) and Witches (also evil) came about.

Finally we are getting to the Halloween we all recognise! Colonial life in some of the new American states kept alive many of the old folk beliefs and traditions. These were not just Irish traditions but those from England, Scotland, Wales, Germany, Poland, France – and we must not forget the influence of the large slave population. Many beliefs and customs had overlapping elements e.g. Mischief Night,community parties to celebrate harvests and so on. The traditional symbols of modern day Halloween have their roots in this melting pot of Folklore.
The Jack ‘o Lantern is believed to have orginated with the Celts who used to carve out lanterns from vegetables. The spooky faces became associated with ghost tales, and may have come from the natural phenomenon of “ignis fatuus” – decaying matter releasing combustible gas in marshes and swamps (will ‘o the wisp; corpse candles etc) How delightfully spooky…all mists, eerie gases…and creepily carved lanterns 
As we have seen, the Celts left food out for the returning ancestors. Door to door begging was common practice in many cultures – often involving a song or poem in exchange for a treat. In Scotland, the guisers would dress up in horrible costumes and masks, carry lanterns and go door to door singing in exchange for apples, nuts or coins. I used to go out at Halloween asking for “Any apples or Nuts?”, hoping that no-one would be so mean as to give me any…I wanted coins!There are plenty more historical and cultural examples – and no Halloween would be complete without bats, vampires, black cats and ghosts – but they will have to wait their turn as this is getting too long!

Happy Halloween!


Pumpkins are for life, not just for Halloween…


Published in issue 1, October 2012
Written by Gill from Personal Space Interiors


Pumpkins are for life, not just for Halloween…

There has been a real American popular culture invasion over the last few years. High school leavers are celebrating their graduation with a school prom, and  ”Penny for the guy” on November  5th has given way to “Trick or treat” on Halloween as the most popular autumnal outing for children of all ages. 
Growing up in the North East, Halloween for me meant hours of gouging a rock solid swede to make something vaguely resembling a Jack O’Lantern. So, the advent of the pumpkin arriving on our shop shelves was something of a revelation. We may not be quite up to the American standard of pumpkin carving…


Image source: http://perezsolomon.com/2010/10/25/the-best-pumpkin-carving-you-will-see-this-

…but at least we’re trying.

But, what happens to all the forgotten pumpkins when November 1st arrives? Whatever you do, don’t throw them away, unless of course your little ones have rendered them not fit for eating. Remember, you’ve already scooped out the seeds, so you’re already half way there! The aroma of roasting pumpkin and the glorious colour greeting you as you bring it from the oven is enough to lift the spirits on any cold, rainy autumn evening. 


here are so many delicious recipes out there, so why not try something different and give that pumpkin a new lease of life! 

     
Delicious and soothing, this soup has such a rich flavour you’d be forgiven for thinking it had loads of ingredients and took an age to prepare. In fact it’s so cheap, quick and simple, it’s sure to become a regular feature on your weekly menu.


One medium pumpkin or squash, cut into large wedges
A good drizzle of rape seed oil
One large onion, finely chopped
A knob of butter
1 litre of Vegetable or chicken stock
250ml milk
Salt and pepper
Freshly grated nutmeg

1. Preheat the oven to 220oC (425oF, gas mark 7)
2. Place the pumpkin wedges on a large, solid baking tray lined with foil and drizzle liberally with rape seed oil
3. Season with sea salt and freshly ground black pepper
4. Bake for around 40 minutes, turning the wedges over during cooking to make sure they brown evenly
5. Meanwhile, heat the butter and another drizzle of rape seed oil in a large saucepan over a medium heat, add the onion and fry until golden and caramelised around the edges
6. Add the roasted pumpkin to the onion along with the stock and milk
7. Season well with salt, pepper and freshly grated nutmeg
8. Turn the heat as low as possible and simmer gently for 20 minutes
9. Blend to a velvety puree – if you really want to you can sieve the soup too, but that’s purely a matter of choice. If you think the soup is a little thick, add a little extra stock or milk.
10. Serve in warm bowls  with a garnish of grated gruyere cheese and crispy bacon pieces


Pumpkin risotto with gorgonzola and walnuts: serves 4


One small pumpkin or squash, peeled and cut into 2cm chunks
A good drizzle of rape seed oil
One large onion finely chopped
A knob of butter
One large juicy garlic clove, crushed or grated
500g Arborio rice
One large glass of dry white wine
One litre of vegetable stock, hot (you could use chicken stock if you prefer)
A sprig of rosemary, finely chopped
75g walnuts (halved or chopped)
100g gorgonzola, in small pieces
Salt and pepper

1. Preheat the oven to 220oC (425oF, gas mark 7)
2. Dry roast the walnuts in a small frying pan for a couple of minutes and set aside
3. Place the pumpkin / squash chunks on a large solid baking tray, drizzle with rape seed oil and bake for around 20 minutes until golden and just softening
4. Meanwhile, in a large saucepan heat the butter and another drizzle of rape seed oil over a medium heat, add the onion and fry until golden and caramelised around the edges
5. Add the rosemary and garlic and fry for another minute
6. Add  a little more rape seed oil to the pan and add the rice, stirring well to make sure every grain gets a nice coating of oil
7. Add the wine and stir until absorbed .
8. Gradually add the stock, one ladle full at a time while you continue to stir the rice. As the rice absorbs the stock, add another ladle full. This should take around 20 minutes
9. Add the roasted pumpkin / squash, walnuts and gorgonzola and stir gently
10. Season well with sea salt and freshly ground black pepper
11. Pop a lid on the pan, turn off the heat and leave the risotto to sit for a few minutes before serving in warmed bowls.