The 'Original' Creative Crafting Magazine written by Crafters, for Crafters

Creative Crafting magazine began in August/September 2009, when a group of crafting friends on the Creative Connections network decided that it would be a good idea to raise awareness of the crafting community. From this point they started work and the first issue of Creative Crafting was published in October 2009 and the last was June 2014.
Now we are bringing you everything crafty from the home and beyond.

Saturday, 30 March 2013

Wedding Wonders with No Wonga - Part Four

Wedding Wonders with No Wonga - Part Four

Published in Issue 22, April 2013
Written by Kerry from Scrapbookerry


Mr L proposed, I said yes and now we are trying to get the wedding of our dreams with the least amount of money possible. Some things we are making ourselves, some things are being given to us, others we are getting through hard labour and lots of routing around for bargains and other things just can’t be budged. So we will try some haggling instead. 
If you are interested in helping us along the Wedding Wonders with No Wonga journey then please do contact us at weddingwonderswithnowonga@gmail.com 

Wedding Dresses
A wedding dress is one of the most important items within a wedding, anyone that has every watched an episode of Don’t Tell the Bride will more than likely heard a phrase similar too “if I don’t like the dress I am not getting married”

It is something we all dream about I think, and something that takes a long time to choose. 
There is also a vast collection of dresses. 

You can go with a very simple dress, a completely elaborate designed dress, a bling dress, a ball room style dress or a mermaid style dress just to name a few.

You can have it short, long, mid length, or just showing of the front of your leg. You can have your dress strapless, halter neck, thin straps, thick straps, sleeves, no sleeves, high necked, backless or with a heart cleavage. 

The colour of your dress is also very versatile, it can be ivory, champagne, white, red, pink, black or even a bit of a mixture you can have flowers all over it if you desire and the material again can be plain, or elaborate, silk, or lace there are numerous options. 
Actually loads of variations and options. 

It is a minefield out there. 

But the variation doesn’t stop there. 

The price of a dress varies from cost effective to the absolute other end of the scale! Where you are looking at a few months’ mortgage payments to get your dress, we are trying to be a little practical so I have already realised that it is very worthwhile to look around. As the dresses vary a lot in different places. 

I really haven’t had a clue about what dress to get. Or even when to start looking. I went to a wedding fair a few weeks ago and they had a Wedding Dress show at the fair and all the shops suggested that for an August 2014 wedding my best bet was to start looking around Christmas time. 

But what to look for?
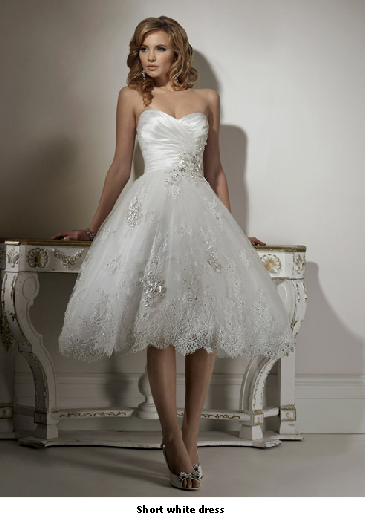
I am not the slimmest of brides, although I am hoping to have lost a few pounds before the wedding day, but I generally have an hour glass, to an apple body shape. So I need a dress that not only works around my wide hips and bum, but also covers my large bust. The only thing that I am determined about is not to be pulling up my dress all day long as it is slipping over my bust. So straps are a must. 


I could go for the traditional, quirky or with a vintage feel being that we are doing a vintage tea party. 
I am not wanting too expensive even though there are some lovely expensive pieces out there. 
Or do I go for the ultimate Do It Yourself Wedding and actually look into making one myself? 
If you are interested in helping us along the Wedding Wonders with No Wonga journey then please do contact us at weddingwonderswithnowonga@gmail.com 


Photo Credits


Flower Page Scrapbook Tutorial

Flower Page Scrapbook Tutorial

Published in Issue 22, April2013
Written by Kerry from Scrapbookery


Scrapbooking is a really nice way to show off your photos, and it doesn’t have to be a selection of pictures. 
Doing a really nice simple yet elegant scrapbook page can be the perfect way to showcase one beautiful picture.
One thing that I love to scrapbook are pictures of flowers that my little boy picks for me or buys me. These are such special moments for any mum and the flowers don’t last that long let’s be honest, especially if it has just been picked from the garden. But the sentiment is something that you want to keep forever. 
So what is simpler than taking a picture and scrapbooking it? Too be honest with the advancement of Smart phones there is no reason not to take a picture as you literally can snap the flower as soon as it is given to you and then transfer this picture to your camera and do a digital scrapbook page without even printing of the photo. 
It is then just a case of printing of the whole page that you have designed and putting this into a frame to keep this lovely moment between mother and son or daughter forever and ever.

I have used a Digital Scrapbooking software programme to make this page, the one that I use is My Memories but there are lots of different programmes out there and this can also be done in Photoshop. 

Open up you software and set a page size for your page, I generally work with 12” x 12” pages and this is the size that I have set for my custom pages. But you can choose any size that you like. 
Add a background page to your page; I bought the Chamomile Tea, by Sugar Moon Designs from MyMemories to use for my page. You can get this kit from here https://www.mymemories.com/store/display_product_page?id=SMCC-MI-1209-20844. 


These kits are fantastic as it means that you have pages and embellishments to use on all your pages, which are all matching and coordinate together. 
Then add a box, to place your picture onto the page, and start to add some embellishments onto the page. Start with some small embellishments and place them where ever you want them on the page, I started with one flower and then two identical smaller flowers, and placed them in a corner of the page. 
Put your picture into the box, and you can rearrange the size, and where you want the picture to go onto the page. 

If you need to move around the embellishments that you first placed onto the page then this is fine. This is advantage of digital scrapbooking, you can move things around repeatedly until you are happy with things. 


I added some ribbons onto my page; with digital software programmes you can put items to the front or back of pages. I put the ribbons on top of the identical flowers and then moved them to the back of the page so that they look like they are behind the flowers. 
Scrapbook pages are fantastic for many things, but they really come alive if you journal on the page. This means that for generations to come people will know what your page is about. I added a small yellow tag, and a button onto the bottom of the page to add some journaling onto the page. 


Once all the embellishments were in place I then added some journaling onto the tag. “Our flowers for Rhianna Lily, for her 1st Birthday 23/03/2013” Journaling doesn’t have to be a lot but if the bare facts are there, as in date, place, people in the picture, or in this case reason for the flowers people will understand this picture for years to come, and will realise why this particular picture was important enough to be scrapbooked. 


Once the page is completed you can print it off yourself and put it into a framed page to hang in your house, or you can put it into an actual Scrapbook album along with lots of other pages.


If you have a go at this Flower Page Scrapbook Tutorial then we would love to see your page here at Creative Crafting. Please do send over your finished page to articles@creative-crafting.com and we will put them all up in a gallery for everyone to see. 


Hand Painted Silk Cards

Hand Painted Silk Cards

Published in Issue 22, April 2013
Written by Jane from Jane Cameron

Suitable for ages 8 and up, or younger children with parental supervision. 
Adults will love this too!


Always do your painting on a wipe-clean surface, and wear an apron. The outlines in the kit have a special backing which means you do not need a frame.


Put a little paint in your palette. The colours can be mixed (for instance, red and blue make purple, while yellow with a hint of blue will make green). If mixing, always start with the lighter colour and add a little bit of the darker colour to it. You can dilute the colours with the white paint, or with water. This will give more pastel shades.


Dip your brush in the palette, and touch it to the silk – the colour will spread on to the silk so you don’t need to paint too close to the lines.

It’s a good idea to finish one colour before moving on to the next. Ensure your brush is clean by washing it in the water pot.

Yellow with a hint of blue will make green. When doing smaller areas, only dip the tip of the brush into the paint. Any overflow will stain the silk, but you can often remove most of it with a clean wet paintbrush and kitchen towel, if you try before it dries.


When painting a larger area in a custom colour, do make sure you have enough paint to cover the full area.


While the silk is still damp, you can paint over some of your work in another colour, if you like. Try painting stripes or dots on top, and watch the colours move. You can also paint one area in several colours if you have two brushes and start one from each end.


Once the main outline is completed, you may wish to paint the border. To paint the border, first make sure you have enough paint to make it all the way round. Then, work both ends at the same time to stop one end drying and making marks on your silk.


Your card is now painted. Wait for it to dry (about 10 minutes), then iron it by placing a dry cloth (e.g. a tea towel) between the silk and the iron. Use a normal iron, and turn off the steam. Note that the cards may curl up while they are drying. This is normal, and they will flatten out again once ironed.


You can then start to assemble your card. Cut around the card to neaten the edge. You may wish to leave some of your border, or cut around the gold line. Glue the back of the picture using a glue stick, and place it on the front of the card.


Press the card until the glue has set.

Congratulations! Your card is now complete.


If you would like to paint your own fabulous silk cards, you can buy kits from my website. The kit includes everything you need to make 5 fabulous cards and comes in a range of designs.


If you would like a more challenging project and the ability to create your own outlines, try my “Silk Painting Starter Kit” instead, which has been approved by the Guild of Silk Painters. This includes one silk outline to get you started, along with everything you need to start painting on a frame. Just add a jar of water and a piece of kitchen towel!


Happy Painting!
Jane Cameron.


www.janecameron.co.uk
www.facebook.com/janecameronartist
www.silkpainters-guild.co.uk

Thursday, 28 March 2013

Tina on the Golf Course - April 2013


Hi I'm Tina !

Yes you did read it correctly I am on the golf course and not in ‘The Garden’, because I am on my yearly trip to Florida.

There  are so many golf courses here I thought you might like to share the beauty of them with me.
I just love being outside in the fresh air, but the golf I produce however leaves a lot to be desired.

Over  here in Florida they are all wanting rain as it has been a very dry summer they tell me; I keep saying they could definitely have had some of ours. There you are, as always we all want what we do not have.

All the courses are irrigated - there are miles and miles of underground pipes. The water used is from the lakes and ponds, most of which are man-made.
Here are just two, there are so many and all so different, but all beautiful. When they are watering though  it can be a little smelly.   

        
The Lakes and ponds are stocked periodically with fish, but fishermen are not allowed - they are just for the birds who flock in their thousands… who wouldn't for a free meal. There is the odd alligator and snake, and turtles which are not the most attractive, but give me those any day rather than the other two. Well it is Florida after all.       


Many of the birds are residents,  these in the photo are herons and wood storks. The storks are really big birds and seem to look even bigger when they fly, which they do a lot from one pond or lake to another.  The delicate white birds are white Ibis, and boy you should see them dig out the worms and insects with those beaks. Sand cranes are really unusual with their pretty red heads; they are large and so noisy, you always know when they are around.         

Not a lot of flowers are used, just the odd perennials. The plants and shrubs are green all year, it is very cleverly done. It is central Florida so there are a lot of the live oaks  with Spanish Moss as you may remember from last year's article.  


If you are a new reader you should check out the past issues. They are just packed with good ideas.
Ok enough of the commercials now back to the program. Let's get back on the golf course, our friends are very patient with me and my camera, but maybe I would play better if I concentrated on the golf  as much as I do on the photos. Well that is my better half's opinion, and he may well be right.

What a feature this dead tree makes, quite beautiful!
 As with the lakes all the courses are very different from the rustic ones of the old Florida to the new more manicured ones.

Now I am off on a totally different subject, I do this as you know, but I just had to share with you this new top which I bought. Just read it, it is me isn't it! Well me and the garden and I had to come all the way to Florida to find it. I just could not resist it. But we can always do with a new top anyway, can't we girls?


This photo is a little different - a frosty morning in Florida, yes they do have them here in central Florida.
But of course it does not stay long, then the warm sunshine is back. 

It is early March as I write this but before I close I will just update you with a few photos that show how the garden was looking in February.
It has kept remarkably green, could that possibly be due to all the rain do you think? Some parts of the Bog are turning into ponds and the water Iris are just peeping up through the water. A natural pond without all the work can't be bad, and they look so clean and fresh. A few spring flowers are beginning to make an appearance.


Well I will leave you now to enjoy the rest of your day, or morning or evening whatever time it is with you, as of course we have readers  and friends all over the world. What a wonderful thought.

Thank you for joining me again and I look forward to your visit in the next issue when I will be once more in The Garden, I can't wait.
See you then.
Your green fingered friend,

Tina

All in a days work!

All in a days work!
Published in Issue 22, April 2013
Written by Sally-Jo from The Bead Bounty
 
I must be flippin’ dead by now!


It was October 2012 when our son introduced us to the lovely Josephine, a nurse in the intensive care unit at our local hospital.
They had just met on a night out in town and had started talking because of Chris’s Dread Locks. Sarah, Josey’s sister, had Dreads too and they are apparently a great conversation starter.
Two weeks later, Chris and Josey announced that they were getting married.
Now most parents would panic, freak-out, give all manner of advice about the pit falls of rushing in (I think there could be a song in there).
But…
The very same thing had happened with my husband Ian and me in 1984.
We had the added bonus of Ian being 17 at the time and I was 22 (our poor parents).
Chris and Josey are late twenties and we figured that if we were still happily married with our 28th anniversary approaching on the 6th of April 2013, then surely they had as much chance of making a go of it as anyone.
And so the planning began.  The date, 23rd of February 2013 was agreed and it was all systems go.
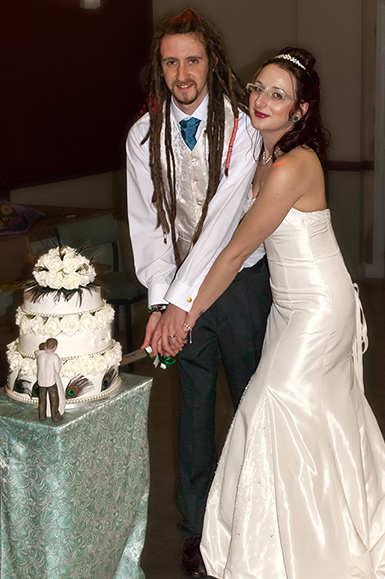
Josey found a stunning fish tail dress with panels encrusted with crystals, just gorgeous. She wanted to go with a ‘Peacock’ theme for the wedding and have her bridesmaids in shades of green.
Josey very kindly asked me to make some of the bits and pieces for the wedding, which I was more than happy to do.  She would like jewellery and bouquets for her 
and the bridesmaids and Buttonholes for the wedding party.  Oh and there was just one more, tiny small thing, The Cake!  It had been years since I had done a wedding cake but I figured it would be like riding a bicycle, you know the one, once learned, you never forget, Lol! And after all, they were on a tight budget so needed all the help they could get.
Well Christmas came and went like a flash and some sad family circumstances had put everything for the wedding on hold.
With three weeks to go I had a lot on my ‘to do’ list.
The Jewellery was first up. Five necklace and bracelet sets finished with sterling silver.  Freshwater pearls and Swarovski crystal AB bi-cones for the bridesmaids.  Freshwater pearls and emerald Swarovski crystal rondelles for Josey, to match her
engagement ring.
Next were the buttonholes.  Wired crystals with little foam roses and peacock feathers.  I used two feathers and three large crystals for the ladies to make them more of a statement.
The bouquets were next.  All manner of crystal and pearl brooches, earrings and rings, some bought and some scavenged from jewellery boxes across the family.  We even had some sent from South Africa.
These were wired and then placed with foam roses to make up the bouquets.  I made small ones for the bridesmaids and a large one for Josey with a centre heart hosting their initials.  When the final ribbon was added for Josey’s bouquet, a couple of pieces of her nana’s jewellery were tied in too, to make it extra special.
So now it was just over a week to the wedding and there was the small matter of a cake.  It was fine I wasn’t panicking, honest!  The cake itself was made and ready to go (provided by a very kind person who knew I needed assistance and who wishes to remain anonymous, you know who you are and I thank you from the bottom of my heart), it was just a matter of the decorating it. Eeeek!
With several very deep breaths taken I made a ‘C’ and a ‘J’ with royal icing and put them in a safe place to dry (at this point my house didn’t really have any safe places left).  I then set about covering the cakes with marzipan.
Once I had done the marzipan it was time for the icing.  Oh how I love fondant, beautiful, wonderful, forgiving fondant.
We had bought a piece of lace with roses on and once I had rolled out the icing, I rolled the lace into it to leave the delicate pattern behind.  This could only be seen close up so did not show too well on the photograph however I assure you it is there.
Now it was a case of constructing the cake using dowel rods, adding the pearls, roses and peacock feathers.
I made a posy for the top of the cake to mirror the bouquets and attached the feathers to the cake using royal icing.
The ‘C’ and ‘J’ were placed on the middle cake with a diamante between.
Just photo’s to take and the list was finally complete.
Nothing like cutting it fine.
So the wedding has been and gone.  It was a wonderful day and God even sent us beautiful white confetti from the sky on the morning.  By two o’clock, when the wedding began, the snow had disappeared, it was dry and the newlyweds were driven to the reception in an open top Vintage Morris Minor that had been provided by some very dear friends, just lovely.
To finish the Fairytale off, Chris and Josey went to South Africa for their honeymoon where they rode elephants, went on safari and visited one of the biggest craft events in the area.  I am not jealous, honest!


Editors note: I know Sally very well and have to say that she put in a huge effort getting everything ready for the wedding, but I’m sure you will agree that she did a fabulous job. There was actually a lot more that she did that she hasn’t owned up to here. ;) All of us at Creative Crafting wish Chris and Josey a wonderful life together and are sure that they appreciate the hard work put in by a very proud mother of the groom. 
 

Thursday, 28 February 2013

Kitchen Capers - The Food of Love

Kitchen Capers - The Food of Love
Published in Issue 21, February 2013
Written by Gill from Personal Space Interiors
Nothing says 'I love you'  quite like a romantic meal, especially if it has been lovingly prepared by that someone in your life. So this Valentine’s Day, why not avoid the busy and overpriced restaurants and treat your loved one to a delicious meal at home. I’ve made this meal rich and indulgent, yet super quick and easy to prepare. After all, there are far better ways to spend Valentine’s Day than being a slave to the kitchen…

Valentine’s Dinner for Two
Roast duck and potatoes with blackberry and port sauce
Broccoli and green beans with toasted almonds

Chocolate pots with chocolate melting moments

Roast duck and potatoes with blackberry port sauce: serves 2

This couldn’t be easier; it practically cooks itself. You can make the blackberry port sauce in advance and just warm through to serve.   
  • Two duck breasts
  • 500g good quality roasting potatoes
  • Salt and pepper
  • 100g fresh blackberries
  • 1 heaped tbsp redcurrant jelly
  • 200ml ruby port
  • 20g butter
  1. Preheat the oven to 220oC (425oF, gas mark 7)
  2. Peel the potatoes and cut into small chunks (around 2.5cm)
  3. Boil the potatoes for 10 minutes in well salted water and drain thoroughly
  4. Preheat a skillet or oven proof sauté pan over a medium-high heat
  5. Use kitchen paper to dry the skin on each duck breast thoroughly. Slash the skin on each duck     breast several times using a very sharp knife.
  6. Place the duck breasts skin side down in the hot pan and leave for 5 minutes until the skin has a rich golden brown colour and the fat has been released.
  7. Turn the duck breasts skin side up and add the potatoes to the pan, turning them thoroughly in the duck fat
  8. Cook in the hot oven for 15 minutes, turning the potatoes during cooking for an even brown
  9. Keep the potatoes warm and let the meat rest for 5 minutes. Season well with salt and pepper     before serving on warmed plates.
  10. For the blackberry port sauce, place the blackberries redcurrant jelly and port in a small sauce     pan and simmer gently until the jelly has dissolved and the port has reduced a little. Taste for sweetness and add a little sugar if required then whisk in the cold butter for a beautiful glossy finish.
Broccoli and green beans with toasted almonds: serves 2

These lovely lightly steamed vegetables cut through the richness of the duck, and the almonds add flavour and texture.
  • One small head of broccoli divided into small florets
  • 150g trimmed green beans
  • 50g flaked almonds
11.        Toast the almonds in a dry pan until lightly golden brown and set aside
12.        Steam the broccoli and beans until just tender; around 5 minutes
13.        Season with salt and pepper and a squeeze of lemon juice, and toss the almonds through before serving

Chocolate pots with chocolate melting moments

Make extra melting moments as these have a habit of disappearing very quickly! The chocolate pots will keep happily in the fridge for a couple of days. The melting moments will keep in an airtight container but they will begin to lose their light as a feather melt in the mouth quality, so don’t make them too far in advance.
  • 75g good quality dark chocolate and 50g good quality milk chocolate
  • 125ml double cream
  • 20g butter
  • Pinch of sea salt
  • 2 tsps rum or brandy - optional
14.        Grate the chocolate finely
15.        In a small saucepan, warm the cream to a gentle simmer and whisk in the grated chocolate until melted.
16.        Remove from the heat and whisk in the butter, salt and rum if using
17.        Spoon into espresso cups or small serving ramekins
18.        Cover with cling film and refrigerate until needed. Remove from the fridge for an hour before     serving.
  • 125g very soft butter
  •  50g icing sugar
  • 50g cornflour
  • 25g cocoa
  • 100g plain flour
19.        Preheat the oven to 180oC (oF, gas mark )
20.        Sift the dry ingredients into the butter and beat with a wooden spoon. The butter must be very soft for the mixture to combine properly.
21.        Roll walnut sized pieces of the dough into balls, place on a baking sheet lined with parchment and flatten with a wet fork. This recipe should make around 20 biscuits.
22.        Bake for 10-12 minutes until risen and lightly cracked on the surface.
23.        Carefully transfer to a wire cooling rack using a palette knife and leave to cool and crisp up.
24.        Serve three melting moments with each chocolate pot and store the rest in an airtight container.

I hope you enjoy my recipes. Why not follow my blog for other foodie treats
http://personal-space-interiors.blogspot.co.uk