
Published in Issue 19, October 2012
Written by Maria River from MsBittyKnacks
Who do you Voodoo?

Instructions and materials listed are to make an 8 inch doll like the one on the picture; of course colors and materials can be changed to your own liking. Now lets have some fun!
Some Materials:
Fabric (Burlap and black Cotton)
Felt Sheet (black & red)
Yarn or Embroidery thread (black and red)
Polyfill Stuffing
Scissors
Pins
Tracing Paper

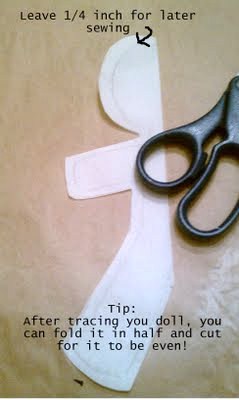
Using the tracing paper, sketch a person. Mine was about 9 inches. Remember to leave as minimum a 1/4 in for later sewing.
Don't worry if it isn't perfect, follow the tip to below for cutting ;)

We are using 2 different fabrics: burlap for the outside and the black cotton for the inside lining.
Using the paper pattern just made, secure it to the fabric with some pins and cut.
But, read the tip below first!


Using the black thread, I do recommend a crafts or heavy duty one; secure the 2 fabrics together along the edge. I used the most basic stitch, a running stitch.

Put aside the little dolls. Using the felt sheets cut out 2 circles (for eyes) and 1 heart.

Secure the felt eyes and heart to the dolls with pins and using matching color yarn or embroidery thread sew in place. Note: you can use a running stitch or a back stitch, your choice* With the black yarn free hand the mouth of the dolls. I used basic XXXX and the classic stitched mouth look.

Now we put it together. Secure the doll with a few pins, right side up. Guiding yourself with the previous stitch done (from step 3) fold the fabric edges towards the inside and sew the 2 flaps together. You will notice the burlap may begin to loosen some fibers, try to tuck them in as best you can, don't worry if some stick out, remember this is a Voodoo doll it's supposed to look raggedy.
PS. don't forget to leave a hole for stuffing, I do recommend the top/ head part.

Copyright 2012 MsBittyKnacks Whimsical Decor & Designs

No comments:
Post a Comment