The 'Original' Creative Crafting Magazine written by Crafters, for Crafters

Creative Crafting magazine began in August/September 2009, when a group of crafting friends on the Creative Connections network decided that it would be a good idea to raise awareness of the crafting community. From this point they started work and the first issue of Creative Crafting was published in October 2009 and the last was June 2014.
Now we are bringing you everything crafty from the home and beyond.

Saturday, 30 March 2013

The Craft Box - Tissue Paper Bangle

The Craft Box - Tissue Paper Bangle

Published in Issue 22, April 2013
Written by Tina from Shinyies

After years of exploring many arts and crafts, I happily settled into jewellery making.
Recently in a big effort to organise my studio/office, I began sorting out my boxes and boxes filled with crafting wonders, which I had accumulated over time.

Rifling through all my papers, stamps, inks, punches, ribbons etc, made me realise just how much I had focused on my jewellery business. So much so that I had forgotten the joy of just "making", to create solely for the purpose of creating. Right then I decided not to hideaway my craft boxes, but instead to once again enjoy "making" for its own sake. Excited I thought I would begin with a crossover piece, connecting my old paper crafts to my jewellery making. So gathering jewellery wire, tissue paper, PVA glue and a few other necessities, this is what I did...

What you will need: 


Instructions: 


Step 1. I began by using the jewellery wire to form the frame of the bangle, carefully manipulating it into the desired shape. 

Then, using small strips of white tissue paper and PVA glue, I covered the wire frame, wrapping around it.


Step 2. Once that was completed and had dried, I started filling in the main of the bangle. This was also done with tissue paper and glue. I used large rectangles of the tissue paper, painted in glue, wrapping the excess over the frames. Gradually covering both sides of the bangle and allowing drying time between the layers. When finished I had a piece of jewellery (albeit very plain) that was strong enough to be worn. 


Then came the really fun part. I used punches to cut out flowers and butterflies from various papers and began adding them to the bangle. I built it up slowly, covering with the tissue paper as I went, adding to the layers. This not only added more strength, but created the illusion of depth as the multiple layers of tissue paper paled the strong colours of the earliest flowers and butterflies.

The end result - a beautiful bangle, a heap load of fun and an eagerness to start my next project. 
Visit Tina at www.shinyies.co.uk


Have you seen our mobile apps?

Have you seen our mobile phone and tablet Apps?


It just got even easier to keep up with our latest articles! Download our Blackberry and Android apps so that you can read ‘on the go!’


Download our Android App from the Google Play Android Marketplace.


Download our Blackberry App from Blackberry World 


Wheat Free Recipes

Wheat Free Recipes

Published in Issue 22, April 2013
Written by Claire from Elderberry Arts


People can have allergies and sensitivities to a wide range of foods and to varying degrees. Foods that are
known to commonly cause problems include milk, wheat, gluten, soy and nuts.

Food intolerance reactions are delayed and often it is not obvious what is causing the problem making it hard tostop them reoccurring. Unlike those from food intolerances, allergic reactions trigger the release of histamine and reactions are obvious and happen quickly after the food is consumed.
Keeping a food diary can help to figure out what is causing food intolerance symptoms. Symptoms can vary andinclude pretty much every aspect of the body. People often crave the foods they are in fact intolerant too. 

Other symptoms may include:
Behavioural/psychological - decreased attention span, hyperactivity, impulsivity, mood swings, anxiety, panic attacks, withdrawal and obsessive behaviours

Neurological – headaches, ringing ears and dizziness

Skin – eczema, rashes, hives and dark circles around the eyes

Digestion – stomach aches, loose stools/diarrhoea, constipation and bloating. Some people alternate between constipation and diarrhoea.

Respiratory – excessive mucus, wheezing, worsening of existing asthma

Cardiovascular – changes in pulse rate and heart beat

It can seem very complicated and overwhelming to think about excluding a food from your diet, especially when itis a food so widespread as milk or wheat. Many supermarkets now stock a range of ‘Free From’ foods and manyhealthy foods such as fruits and vegetables are natural free from these items. Alterative such as rice or oat meal, corn or rice pastas or alternative flours such as gram (chickpea), coconut, buckwheat or rice can be bought and used mostly as you would the wheat versions or cow’s milk.

A huge range of blogs, websites and books are also available for suggestions, recipes and information to help you along the way. It can be surprising how well known ingredients can be used in new ways to create delicious and healthy meals without having to worry about the effects of your food intolerance. Just because you are following a special diet does not mean you have to miss out as I hope the following recipes will show.

Raw Chocolate Brownies
Makes: Approx. 16 brownies
2 cups raw almonds
1 pound Medjool dates with the stones removed
5 heaped teaspoons raw cocoa powder
1-2 tablespoons raw agave nectar (optional)

Blend almonds in a food processor until finely ground. Add all of the remaining ingredients and process until they combine fully.
Press the mixture into an 8×8-inch baking dish and place in the freezer for at least an hour or in a refrigerator overnight.
Cut into pieces and serve.
These brownies last really well if kept in a seal container in the fridge.


Banana Ice Cream
4 bananas
250ml plain soya yoghurt

Peel and roughly slice the bananas. Place in a plastic container and freeze until solid.
Place the frozen bananas and yoghurt in a blender or food processor and mix until smooth.


Mushroom Burger
1/2 portabello mushroom, diced
1/4 red onion thinly sliced
Garlic clove
salt and pepper
1/4 tsp paprika

Approximately 1/2 cup wheat free breadcrumbs or bread
Put everything in a food processor and blend until well combined. 
You can completely blend it or pulse for a more ‘chunky’ texture.
Shape into two burgers and grill for approx. 10 minutes each side.


Crafting On A Budget

Crafting On A Budget

Published in Issue 22, April 2013
Written by Leanne from Small Surprises Boutique


The art of crafting is a hobby that is available to many people, and as I have been finding out it doesn't have to be expensive. This is the start of a new series entitled ‘Crafting on a Budget’, to demonstrate it doesn't have to cost the earth to be creative. 

I found my way into the world of arts and crafts during the summer of 2012 after creating some baby safe toys for my niece, and I was instantly hooked. Ideas for other projects soon began to form and after browsing through the work of others I was worried I would be in a different league, a lower league, purely for the reason I don’t have the funds to dedicate to my projects. Many people are likely to be in the exact same situation, which is why I wanted to share my experiences so far, and hopefully prove you can craft on a budget. The first of this new series of articles will focus on creating tasteful products from things you already have, or may have, around the house, in the garden or around and about. 

It is surprising what you can create from what you already have lying around, which can be transferred into a simple, hand decorated classic. My first project, although a simple one, proved to be somewhat effective. Whilst having a clear out I discovered a set of plain cream coloured candles that had been given as a present some time ago, and after buying some beads they were the ideal collaboration. Held together with sewing pins I’d had in my sewing box for many years, the beads provided a bit of sparkle to brighten up an otherwise ordinary household decoration, and it was at a very minimal cost. 


I’ve used this idea for a number of products, using beads and buttons to decorate plain candles, and it works very well. Personally I found that decorating something that already exists gives you a gentle start in the craft world, and also sends your thought process into overdrive with other ideas. Simple is always effective, and helps to keep your costs down. 


Recycling items you find around the house is an ideal way to keep your crafting budget to a minimum. A simple tidy up of my dad’s garden shed gave me some inspiration for a range of products – wooden signs and ornaments. Strips of wood he was about to throw away suddenly became useful again in my mind. After buying some very cheap wooden letters, adding a splash of paint and a bit of extra strong glue I had created something simple yet tasteful to display proudly in my home, or sell on should the occasion call for it. 


Inspiration is all around us. Much of my inspiration comes from one of my favourite places, Cornwall. I have been an avid visitor to the glorious South West for 20 years, after holidaying there since I was very young. Whilst on holiday there last summer inspiration hit heavily and led me to the local beach. After collecting pebbles, driftwood, sand and shells I started to create a range of beach themed items – candle holders, decorated pebbles, decorated candles, for instance. You can buy pebbles and shells from a number of different shops, but hand picking them yourself is friendlier on your bank balance, and it’s enjoyable; it also ensures you collect exactly what you need. 

Recently I have moved my attentions to cushion covers. My main goal is to make my own, but being between sewing machines at the moment I haven’t been able to produce my own. Instead I have been decorating already existing plain cushion covers, which is another way to utilise your creative needs. 

Obviously it is not possible to craft and create solely on what you find at home, or at the beach, it does take some expenditure, but it doesn’t need to break the bank. Initially I thought the only way to find the supplies I needed would be from top end craft retailers, but if you know what you’re looking for there are always cheaper alternatives, such as your local market. We will explore these alternatives further throughout this series. 

In the meantime, I hope you find my experiences so far useful. If you’re new to the crafting world, or if you’re looking for some new inspiration, why not have a look around the house and see what you can find to embellish. 


Simple Gemstone Wire Wrapped Ring

Simple Gemstone Wire Wrapped Ring

Published in Issue 22, April 2013
Written by Samantha from OKCreations


This is the finished ring made from turquoise nuggets and silver plated wire


To make the ring you will require a few basic ingredients:


1. Some beads; small irregular shaped beads like chips or nuggets work best but any small bead will work, just have a play about and let the beads do the work for you.


2. Some wire; 1mm for the ring base and 0.4mm to wrap with, any colour goes, experiment and have some fun!


3. A pair of flat nose pliers and some side cutter pliers.


4. A ring mandrel or marker pen to shape the ring base around, something slightly larger than your finger as the finished ring will end up a size smaller after the wire wrapping.


Instructions

Step 1. Begin by wrapping the 1mm wire around the mandrel, one size larger than anticipated; make the wire overlap by about 1cm.


Step 2. Start wrapping with the 0.4mm wire; using as long a length as comfortable start at the overlap leaving a 6cm tail and cover with the wire wraps, continue wrapping around the remainder of the ring until you meet the overlapped end of the 1mm wire again.

(Shown in antique bronze wire for detail.)


Step 3. Once the entire ring is tightly wrapped and looks like a tightly coiled spring you can start adding gemstones.  Do not cut off the tails; use the tail that you used to wrap around and add the first stone, holding the stone on the top edge of the ring wrap twice around before adding the second stone.


Step 4. Add the second stone and wrap twice more, you will find the stones find their own place and will not necessarily sit where you expect.  Just work along the ring wrapping twice between each stone until you reach the other edge of the overlap.  If you run out of wire just wrap the original around to secure and cut short between the stones in a place where it will not show or scratch.


Step 5. You can add in stones where you feel more need adding by wrapping the wire round until you meet the point you want to add, you can also layer stones on top of each other to build height and shape.  Add as many as you feel is right or use a few metallic beads to add contrast.


Step 6. Secure any wires by wrapping, cutting short and hiding between the stones, pop on the mandrel to reshape and size if necessary and your ring is finished!


Stretch that Sunday

Stretch that Sunday

Published in Issue 22, April 2013
Written by Gill from Personal Space Interiors

As the economy continues to struggle, penny pinching is reaching new levels for us all. So this month I’m in a frugal frame of mind with some ideas for tasty dishes following on from a traditional roast Sunday lunch. Don’t think of it as leftovers, think of it as new beginnings. You’ll be amazed how much you can make if you use a little imagination. I’ve given you a few recipes here, along with some ideas for you to experiment with. Get creative with your cupboard contents!


My top 5 store cupboard saviours: 

1. Dried or tinned beans and pulses – these can make a little meat go a long way as they absorb all the flavour and add bulk and valuable protein to your casseroles and stews.
2. Dried tarragon – many dried herbs really suffer from the drying process and lack flavour. Tarragon is one exception and works brilliantly with chicken and fish. It really gives a fragrant boost so use sparingly.
3. Vermouth – I always keep a bottle of vermouth as you can use it in place of white wine and it keeps well once opened.
4. Roasted red peppers in a jar – chargrilled and peeled peppers are fantastic. They’re bursting with flavour and can transform a dish in seconds.
5. Pesto – this is as close as I get to a ready meal! Instant sauce that can be added to pasta, mash or rice. Add a squeeze of lemon to lift the flavour and cut through the richness.

Roast chicken

What to do with leftover roast chicken? Here’s some ideas:
…stock…chicken and chorizo paella…chicken, lemon and pesto spaghetti…chicken and bacon pot pies…fajitas…chicken and mushroom lasagne…chicken and leek risotto.

Stock
First, strip all the meat from the carcass remembering the juicy little oysters that have so much succulence and flavour. Then use the carcass and any remaining chicken skin to make stock. If it’s only a small chicken, you can save the bones in the freezer in a bag until you have enough. 
Place the carcass in a large saucepan and add an onion, a carrot and a stick of celery with some bay leaves, thyme and seasoning.
Add a dash of wine (optional) and cover with water.
Cover and boil for 2 hours, then drain through a sieve and store in a plastic container.

Chicken and chorizo paella

Serves 4
  • 1 large onion, finely chopped
  • 2 cloves garlic, crushed
  • 300g rice – you can get paella rice, but basmati will work fine
  • A dash of white wine or vermouth
  • 100g frozen peas
  • 100g chorizo picante, skinned and cut into 1cm cubes
  • 2 tsp paprika
  • 2 tsp dried tarragon
  • Zest and juice of a lemon
  • 600ml chicken stock
  • Sea salt and freshly ground black pepper
  • Fry the onion and chorizo in a little olive oil in a wide shallow sauté pan until golden and the chorizo has released its oil, then add the garlic to soften for a minute.
  • Stir the rice through to make sure each grain is coated in the lovely oil from the chorizo.
  • Add the wine and let it bubble through and reduce a little.
  • Add the rest of the ingredients then stir, cover and simmer gently for around 20 minutes.
  • Turn off the heat and leave to rest for 5 minutes before serving in warmed bowls with a wedge of lemon.


Roast lamb

What to do with leftover roast lamb? Here’s some ideas:

…lamb and bean casserole…spiced lamb soup…shepherd’s pie with root mash topping…lamb pittas with harissa and mint dressing…lamb samosas…fruity lamb curry…
Use leftovers from the roast dinner to make shepherd’s pie with root mash topping.

Fry a finely chopped onion until golden and add leftover lamb and green beans chopped into small pieces. Add any leftover gravy and a dash of Worcestershire sauce. Simmer for 10 minutes, place in an ovenproof roasting dish then set aside to cool. 
Mash together the leftover potatoes, swede and carrots and season well.
Spread the root mash over the cooled meat filling and use a fork to create a rough surface.
Bake at 190oC for 30 minutes until golden brown and piping hot.

Strip the meat from the bone, then use the bone to make a spiced lamb soup;

Fry a chopped onion until golden, add a crushed clove of garlic and a tsp each of ground cumin, ground coriander and chilli powder.
Place the lamb bone in the pan, add enough boiling water to cover and 2 tbsp tomato puree.
Simmer for 1½ hours and 5 minutes before serving add 50g couscous, the juice of a lemon and some chopped fresh mint. Season well with salt and pepper and serve in warmed bowls with pitta bread.

Lamb and bean casserole
Serves 4
I large onion, roughly chopped
2 cloves garlic, crushed
2 tins beans – flageolet, cannellini, borlotti or butter beans are ideal
1 tin chopped tomatoes
500ml lamb stock
Fresh thyme
Roast lamb leg or shoulder cut into strips or chunks

In a large pan, fry the onion in a little olive oil until golden. Add the garlic and soften for a minute. 
Add all the rest of the ingredients (don’t add salt at this stage), give it a good stir, cover and place in the oven for 1½ hours. 
Season well with salt and pepper and serve in warmed bowls with some steamed spring greens.


I hope you enjoy my recipes. 
Why not follow my blog for other foodie treats 


An Interview with Tumblebead

An Interview with Sara from Tumblebead

Published in Issue 22, April 2013


Tell us about the lady behind Tumblebead
My name is Sara Johnson and I am the creator of Tumblebead, which has been in force for a year now and will hopefully grow in to something huge.


When did you first begin creating your designs, and why?
I have always been a bead addict since a small girl and just love those little balls with a hole; I rekindled my love for beads after some years off and I am very happy I did. It is nice to see people wear my creations. Just need to find a celebrity to endorse me now.

What is it that you enjoy about your work?


Buying beads of course and trying to make something new and imaginative.


What is your biggest crafting achievement, and why?
I was chosen to be one of the fifty designers on a ‘Bead and Beyond’ magazine challenge in the March edition 2012 - one of the pictures was featured in the magazine and both were featured on their website. This was what triggered me to start Tumblebead.


Other than your crafting, what else do you like to do?
I have an allotment which I just love even though I don't really eat vegetables! I also read and enjoy photography and I am also a footy mum - I’ve not missed a single game of my son’s team!


If you had to choose your favourite from your creation’s which one would it be?
It is hard to say which is my favourite as I am still developing my style, but I do like my Spikey collection.
Where does your inspiration come from?
No particular place - all over really, sometimes it is just a particular bead that can set me off on a tangent.


If you could change one thing about what you do, what would it be?
Be less negative about my work and appreciate my creations are just as good as others.


Do you have a favourite website?
Well we would be here all day if I was to list all my favourite bead websites. I do like to shop for small shiny objects and some would say I am obsessed!


Has any person helped or supported you more than any other?
Creative Connections has been great as there are so many people to help and support you with any problem or to run ideas past. My family is great too with moral support.


Tell us a random fact about yourself!
I eat a lot of chocolate!


Toby & Mummy Makes... Pineapple and Mango Upside-Down Cake

Toby & Mummy Makes... Pineapple and Mango Upside-Down Cake

Published in Issue 22, April 2013
Written by Tracey from Wow Thank You

A blast from the past, I remember pineapple upside-down cake as a child.

My mum was a school cook, and I basically grew up on tray bake leftovers! 

Pineapple upside-down cake was one of the better desserts I recall and I thought it would be fun to revisit this retro culinary delight with Toby, while Millie-Mae was at school. 

It’s quick and simple to make, so perfect for the short attention span of a 4 year old.

You will need

For the topping:
50g softened butter
50g sugar
Pineapple rings in juice
Mango (optional)
Glace cherries

For the cake:
100g softened butter
100g sugar
100g self-raising flour
1tsp baking powder
1tsp vanilla extract
2 eggs
Greaseproof paper
21-25cm square or round tin or Pyrex dish

Step 1. Heat oven to 180C (160C if fan oven)/gas 4.

Step 2. For the topping, beat the butter and sugar together until creamy. 

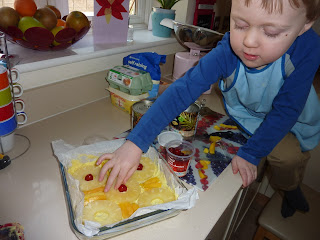
Step 3. Line your tin/dish with damp greaseproof paper, then spread the mixture over the base and a quarter of the way up the side.
Arrange the pineapple rings and mango on top of the mixture, placing a cherry in the centre of each pineapple ring. 


Step 4. To make the cake, put all the ingredients into a mixing bowl (butter, sugar, flour, baking powder, vanilla extract, eggs) along with 2 tablespoons of the juice from the tin of pineapple rings. Beat to a soft consistency. 


Step 5. Spoon over the top of the pineapple and cherries, smoothing it out so it’s level. 

Now it’s allowed to lick the spoon …


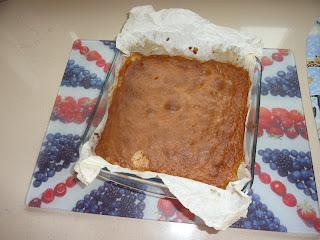
Step 6. Bake for 35 minutes, then leave to stand for 15-30 minutes. 


Step 7. Turn out onto a plate, and after admiring, eat while still warm!